Edward Ross and Dan Berry talk about speaking the language of film, science fact (not fiction) and measuring success.


Edward Ross and Dan Berry talk about speaking the language of film, science fact (not fiction) and measuring success.
Edward Ross and Dan Berry talk about speaking the language of film, science fact (not fiction) and measuring success.
Kristyna Baczynski (Kriss-Tenner Baa-Chin-Ski, not Chris-Teena Baaz-In-Ski) and Dan Berry talk about the correct pronunciation of her name, heritage and the idea of artistic style as an accent. Kristyna was also the very first make it then tell everybody guest back in october 2012 as well as creating all the show’s artwork.

Kristyna Baczynski (Kriss-Tenner Baa-Chin-Ski, not Chris-Teena Baaz-In-Ski) and Dan Berry talk about the correct pronunciation of her name, heritage and the idea of artistic style as an accent.
Viv Schwarz and Dan Berry talk hospital clowns, creative processes and writing the voice of a character.

Viv Schwarz and Dan Berry talk hospital clowns, creative processes and writing the voice of a character.
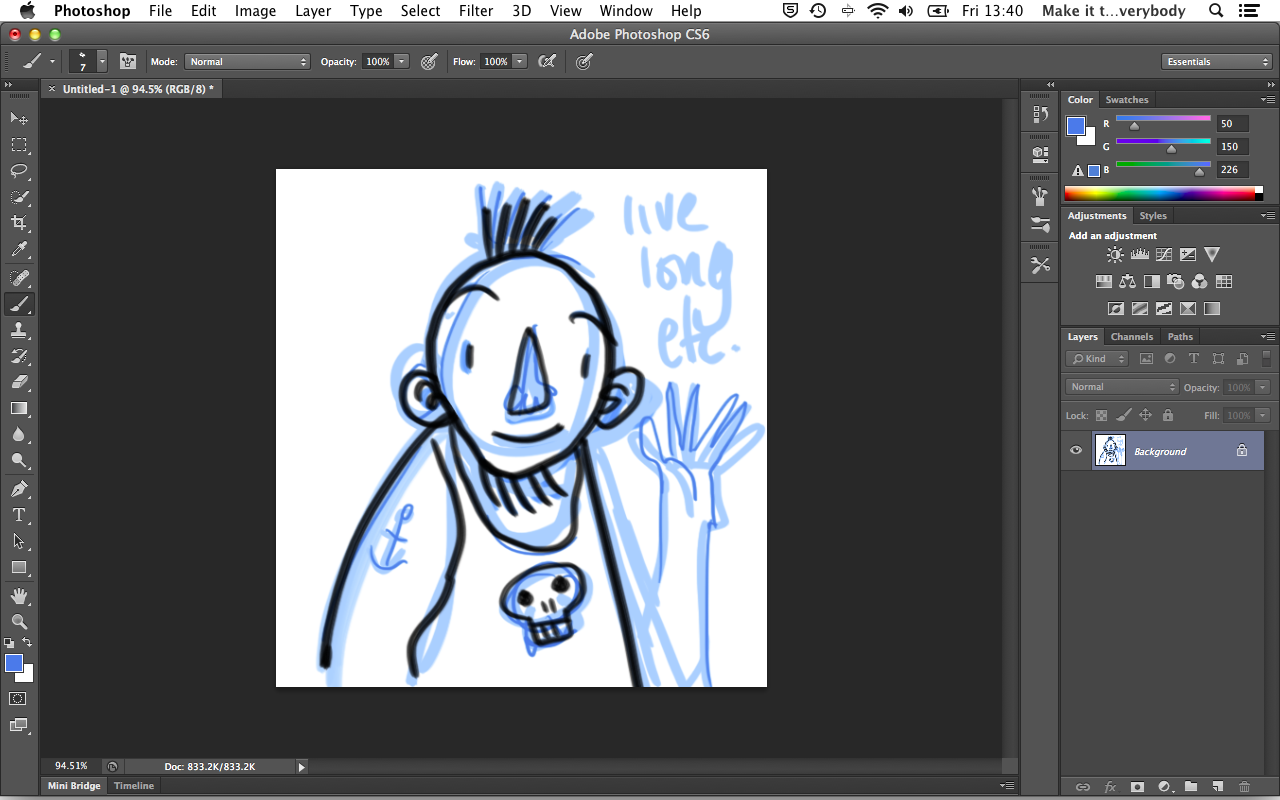
This is not a technique I use very often at all, but it can be handy to know. A lot of people use a blue pencil to rough out their work and then ink on top. I have seen people plan out all their lettering with a computer, print it out in blue and then ink on top of the lettering to make sure that the consistency is mechanical, but the letterforms are very human. Here is an easy way to remove these blue lines, leaving only the black.
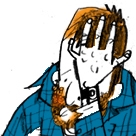
| 1 | So here is your image. You roughed it out in blue and inked on top then scanned it in. |  |
| 2 | The aim here is to remove the blue lines. Go to Image -> Adjustments -> Channel Mixer. | 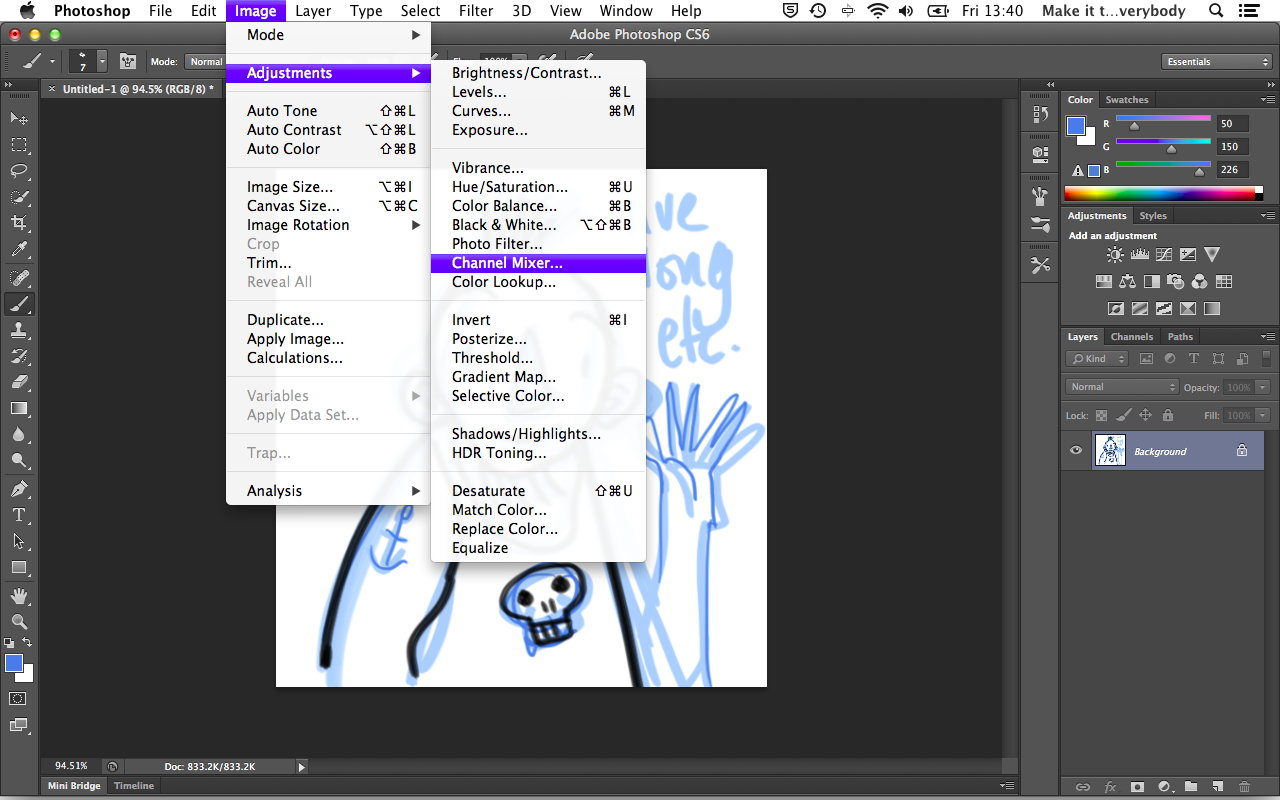 |
| 3 | Choose Black & White with blue filter from the preset dropdown and see what that does to the blue lines. It has removed most of the blue, but where the blue was darker it still shows as a pale grey. You can still see his anchor tattoo. | 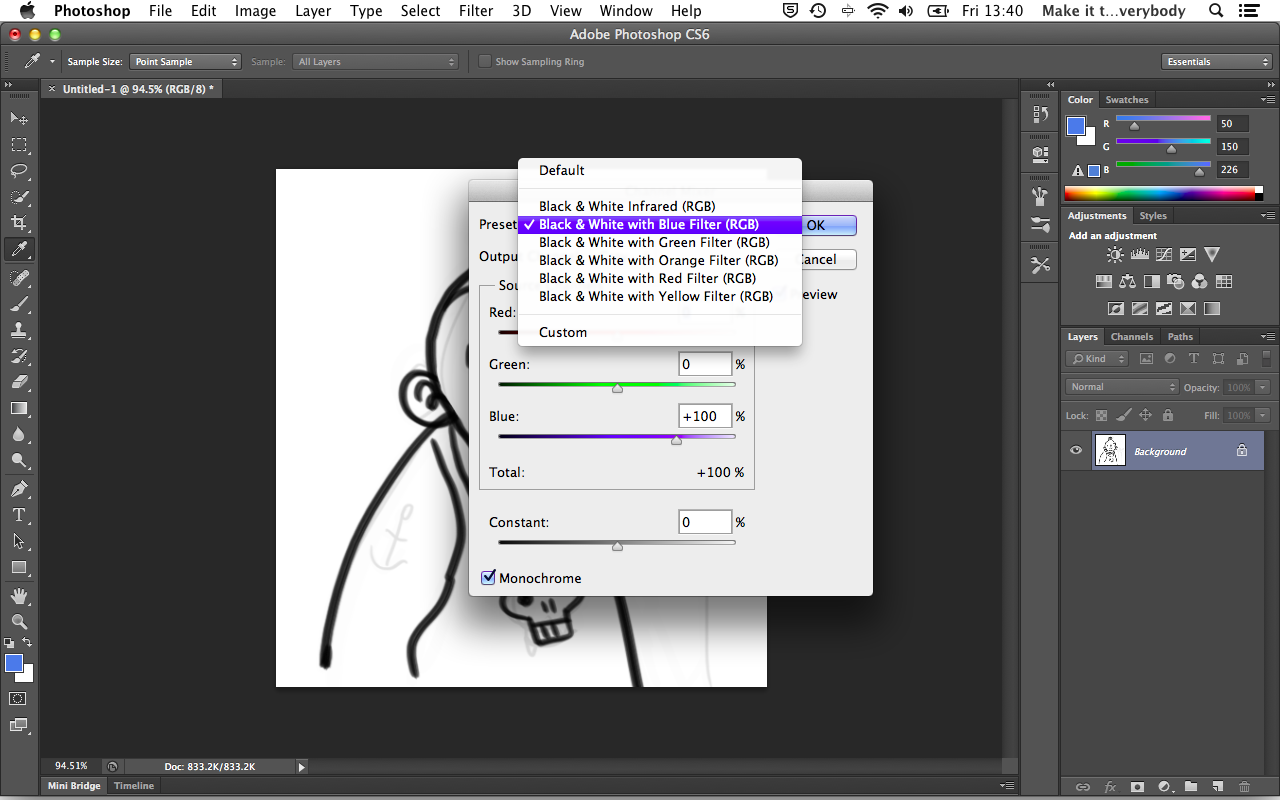 |
| 4 | Adjust the blue slider up until the pale greys disappear. Once you are happy, click OK. |  |
| 5 | Now maybe, just maybe your blacks have become a bit washed out too. Go to Image -> Adjustments -> Levels and correct this. Levels are great but they are a bit of a blunt instrument. What they essentially allow you to do is reset where perfect black and perfect white are in an image. See that lumpy graph? That is a bar graph of where all the black, grey and white pixels are, perfect black being at the far left and perfect white being at the far right. It corresponds to the gradient scale below it. You can see from the lump on the graph that most of the pixels in this image are a dark grey. Grab the slider on the left and move it towards the lump. You should notice if you have the preview checkbox ticked that the black lines get blacker. You can do the same for whites and greys too. And thats that. Enjoy! | 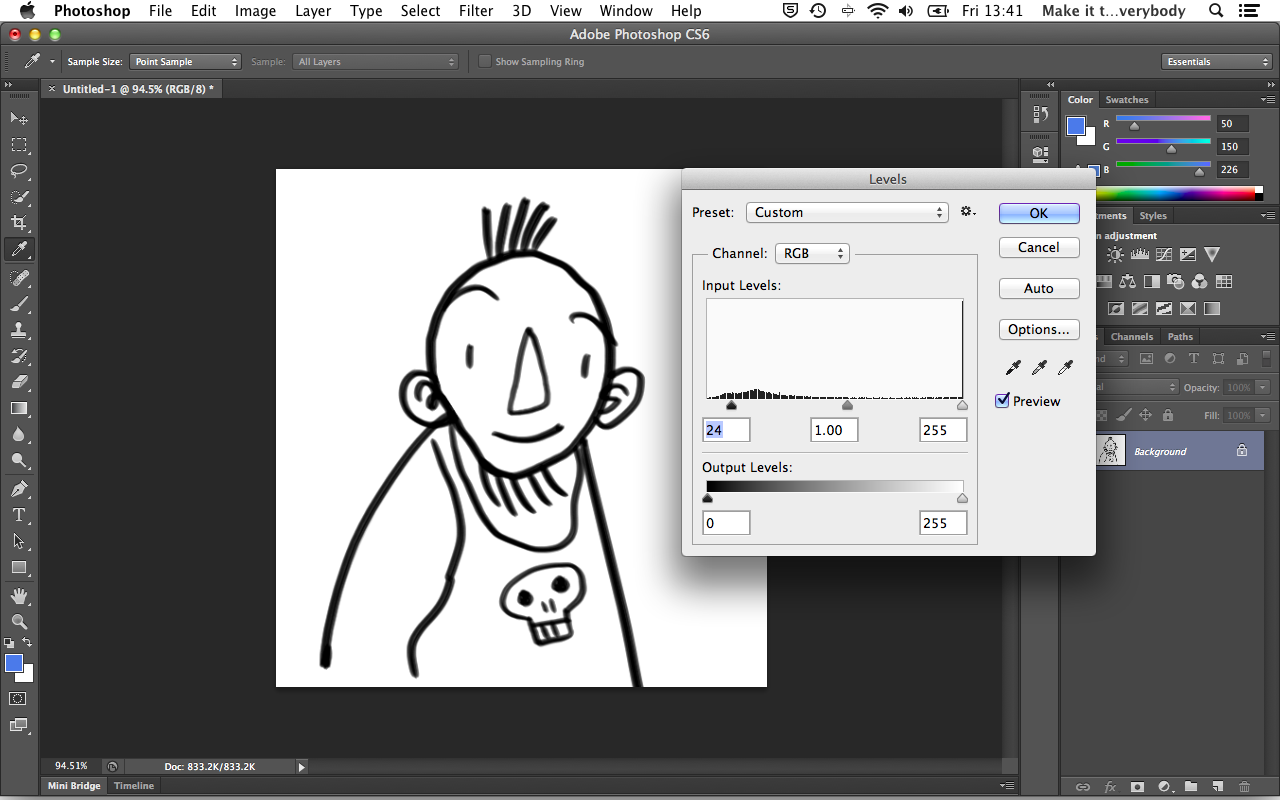 |
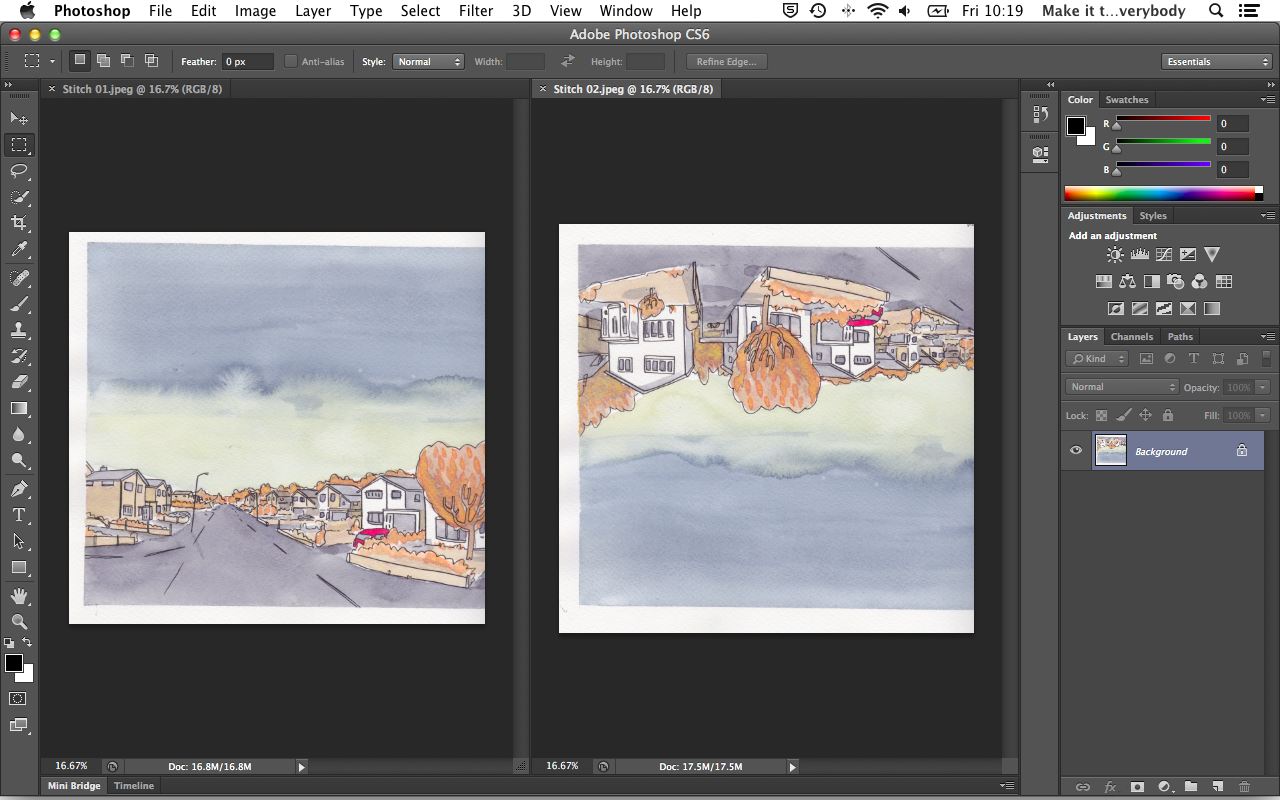
Sometimes, your scanner is just too small or your artwork is just too big. What I used to do was take this folder of scans and manually painstakingly put it together. The downside of doing it this way is that not only does it take forever (not a good situation if you have a deadline looming) it is also incredibly frustrating. If only there was a way to get the computer to do the heavy lifting for you. Well, there is a way and it is pretty simple. Here is what you need;
| 1 | What you need to do is to load all of the images you want to stitch together into photoshop. Try not to have any other files open other than the images you will be stitching. Try to make sure that your scans have enough overlap for the computer to see where to stitch them. It doesnt work if you are trying to align edges, it works better when the scans overlap more. Sometimes this is a process of trial and error. You can see from the image that one of them has scanned upside down. This occasionally makes it difficult for the computer to calculate the overlap. If this happens to you, rotate and save it before getting onto the next step. |  |
| 2 | Go to File -> Automate -> Photomerge | 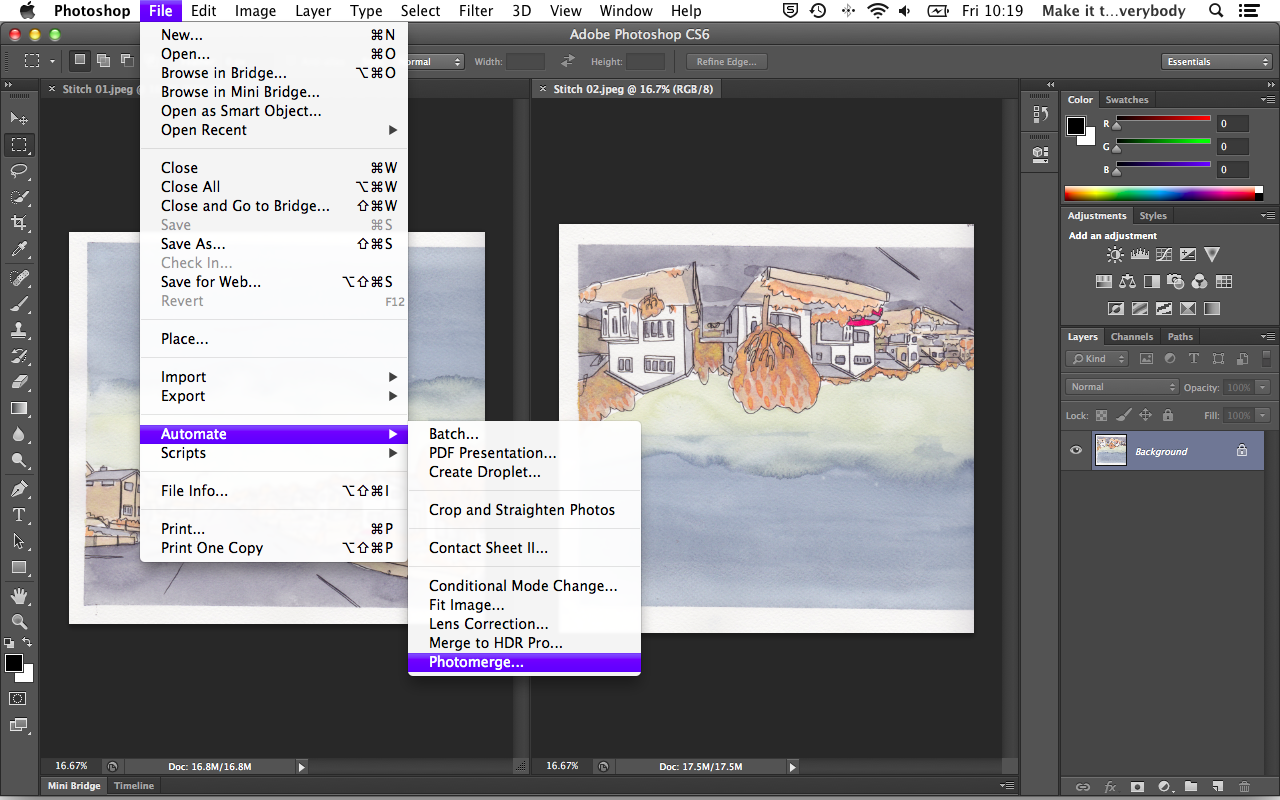 |
| 3 | Here is the dialogue box (or a variation of it) that you should see. Click add open files and it should list all of your scans. Click OK. | 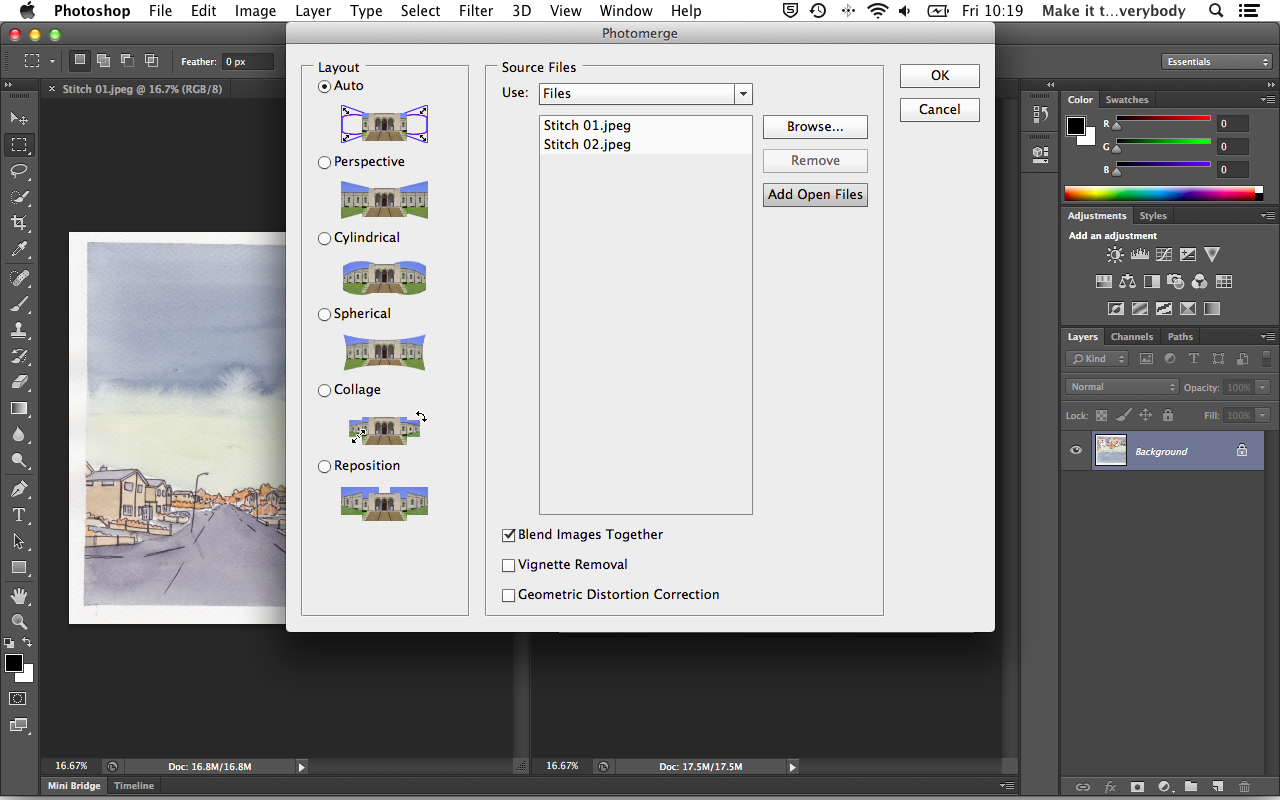 |
| 4 | Photomerge works some magic to align your images into a new document. If it says that it cannot align the images, go back a few steps and check the rotation of your images and make sure they overlap enough. If there is not enough overlap, take another scan from where the join is and try again. This one has been stitched upside down. If you have the same thing, go to Image -> Image Rotation and rotate it accordingly. |  |
| 5 | So all being well, your image has been stitched but it is not quite ready yet - look at the layers. Photomerge has used some kind of mask to align your scans. Select both layers and then go to Layer -> Merge Layers. | 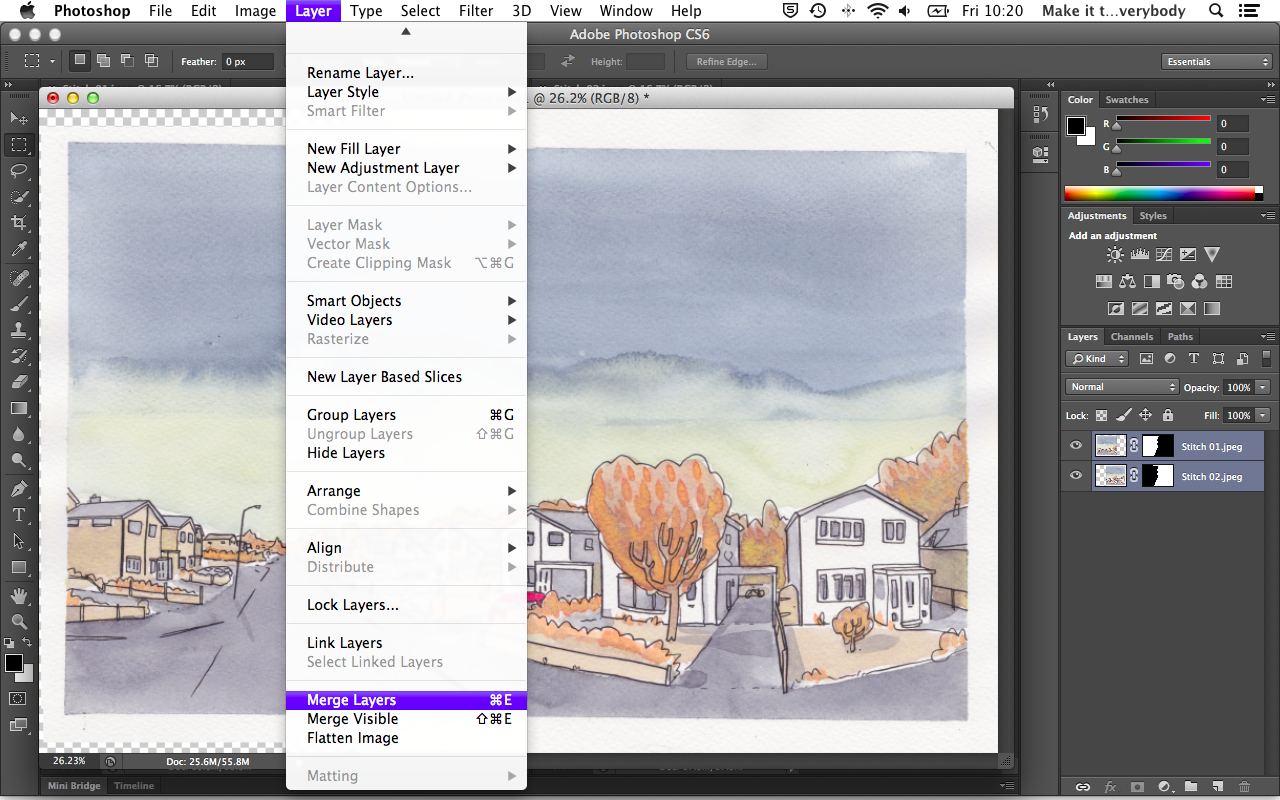 |
| 6 | With the layers neatly merged together you can use the crop tool to sort out any skewing. Thats about it. Enjoy! | 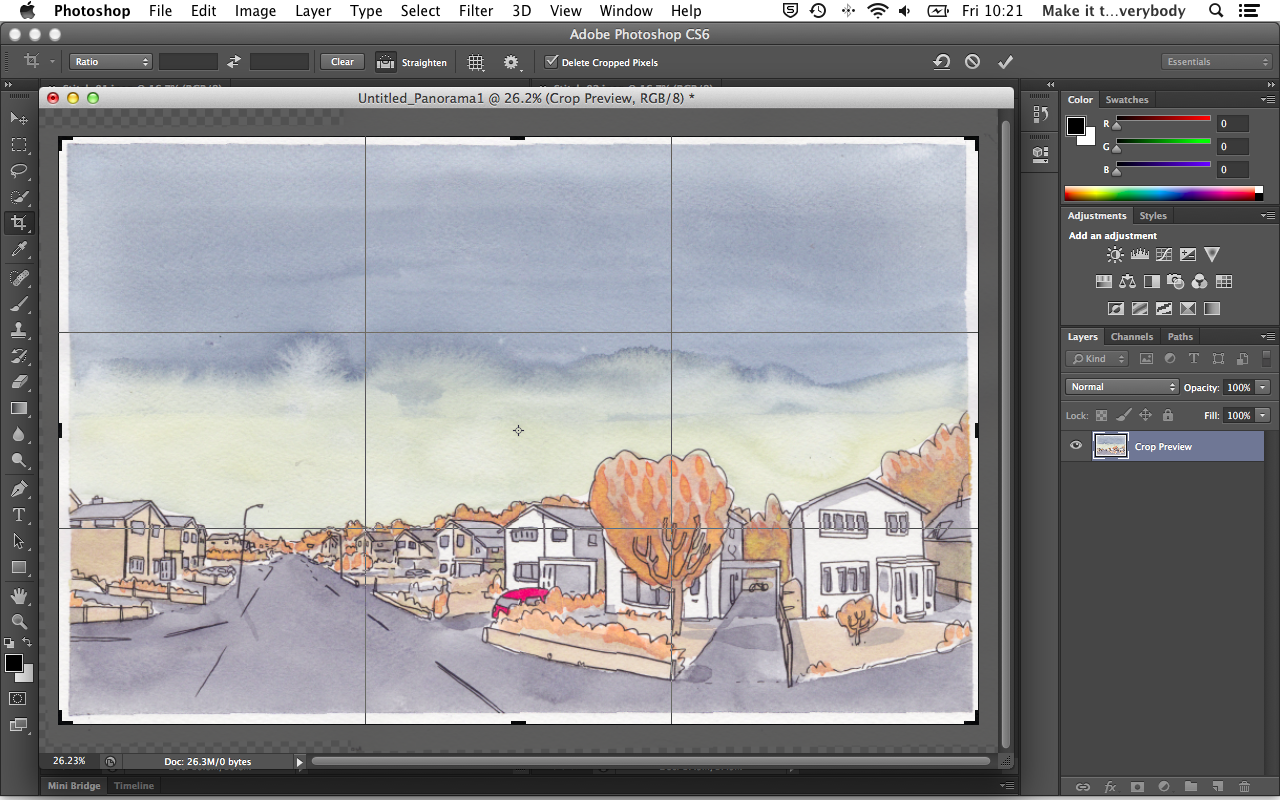 |
Luke Pearson and Dan Berry talk amongst other things about Luke’s entrance into comics, his process and responding to compliments.

Luke Pearson and Dan Berry talk about Luke’s entrance into comics, his process and responding to compliments.

John Martz and Dan Berry talk about his work, tools, the differences between intuitive and planned drawing and the influential illustration blog Drawn! that John started and ran for 8 years. John and Dan talk about how the conditions that led to it’s success (that blogging platforms allowed it to exist) eventually lead to it’s closure (everyone being able to do exactly that all the time).

John Martz and Dan Berry talk about his work, tools, the differences between intuitive and planned drawing and the influential illustration blog Drawn! that John started and ran for 8 years. John and Dan talk about how the conditions that led to it’s success (that blogging platforms allowed it to exist) eventually lead to it’s closure (everyone being able to do exactly that all the time).
Roger Langridge and Dan Berry chat about tricking people into liking their work, getting better at writing and remaining visible.

Roger Langridge and Dan Berry chat about tricking people into liking their work, getting better at writing and remaining visible.
Ok, here’s a couple of things. I’ve put together the means to send out a monthly newsletter. It’ll have a recap of the month’s episodes, some behind the scenes stuff, happenings and updates on all things Make/Tell. It will possibly be the best damned email newsletter you’ve ever signed up to. Think of it like a newspaper that gets emailed to you or a pen-pal you don’t really write back to or one of those family letters that get sent out at christmas, only every month. Perfect. There’s a handy box in the sidebar just to the right here, so go and do that.
I’m drumming up donations to help cover the cost of travelling to do more interviews in person. I think you can tell from the shows so far that I prefer chatting face to face. Not only do I get more control over the sound quality, it’s much nicer to talk to someone in person instead of through a screen. If you like the idea of this, donate whatever you want to help me do this. If you are completely happy with the show exactly as it is, then still consider donating a quid or two. It costs me money to do this show, and your donations mean I get to keep doing it. What I’d really like is for people to set up a recurring donation so I can plan stuff ahead. That’d be cool.
Talking of planning ahead, I’m planning on producing a handful of shorter more polished shows on specific themes. It should be fun. The working title for these is ‘Be Specific’.
So in summary, give me your email address and your money and I’ll keep recording myself talking to people.
Ryan North and Dan Berry talk about writing Dinosaur Comics comic for ten years, writing the Adventure Time comics, the webcomics marketing economy and running the largest kickstarter publishing project.

Ryan North and Dan Berry talk about writing Dinosaur Comics comic for ten years, writing the Adventure Time comics, the webcomics marketing economy and running the largest kickstarter publishing project.
Declan Shalvey and Dan Berry recorded a conversation at the 2D festival in Derry over breakfast in a restaurant, hence the background noise. Topics covered include the way that other cultures see each other, process and realism.

Declan Shalvey and Dan Berry recorded a conversation at the 2D festival in Derry over breakfast in a restaurant, hence the background noise. Topics covered include the way that other cultures see each other, process and realism.
Warwick Johnson Cadwell and Dan Berry talk at the 2D festival in Derry, Northern Ireland about making noises while drawing, quality of line and driving someone else’s car. Warwick was also on the very first Make It Then Tell Everybody. Check that out too.
